> ## Documentation Index
> Fetch the complete documentation index at: https://docs.textin.com/llms.txt
> Use this file to discover all available pages before exploring further.
# Postman调试教程
> 通过Postman快速调试文档解析API
## 概述
本文档将指导您如何使用Postman导入和调试文档解析API。Postman是一款流行的API测试工具,可以帮助您快速验证API调用。
## 先决条件
* 已安装Postman([下载地址](https://www.postman.com/downloads/))
* 已获取API Key(x-ti-app-id 和 x-ti-secret-code),请前往 [TextIn工作台 - 账号与开发者信息](https://www.textin.com/console/dashboard/setting) 获取
## curl命令示例
### 方式一:上传本地文件
```bash theme={null}
curl -X POST 'https://api.textin.com/ai/service/v1/pdf_to_markdown?dpi=144&get_image=objects&parse_mode=auto' \
--header 'x-ti-app-id: YOUR_APP_ID' \
--header 'x-ti-secret-code: YOUR_SECRET_CODE' \
--header 'Content-Type: application/octet-stream' \
--data-binary '@your_file.pdf'
```
### 方式二:使用文件URL
```bash theme={null}
curl -X POST 'https://api.textin.com/ai/service/v1/pdf_to_markdown?dpi=144&get_image=objects&parse_mode=auto' \
--header 'x-ti-app-id: YOUR_APP_ID' \
--header 'x-ti-secret-code: YOUR_SECRET_CODE' \
--header 'Content-Type: text/plain' \
--data 'https://web-api.textin.com/open/image/download?filename=54efc36a05cf475aa6b39137b0717726'
```
## 导入curl命令到Postman
### 步骤1:复制curl命令
复制上面的curl命令(方式一或方式二),根据您的需求选择。
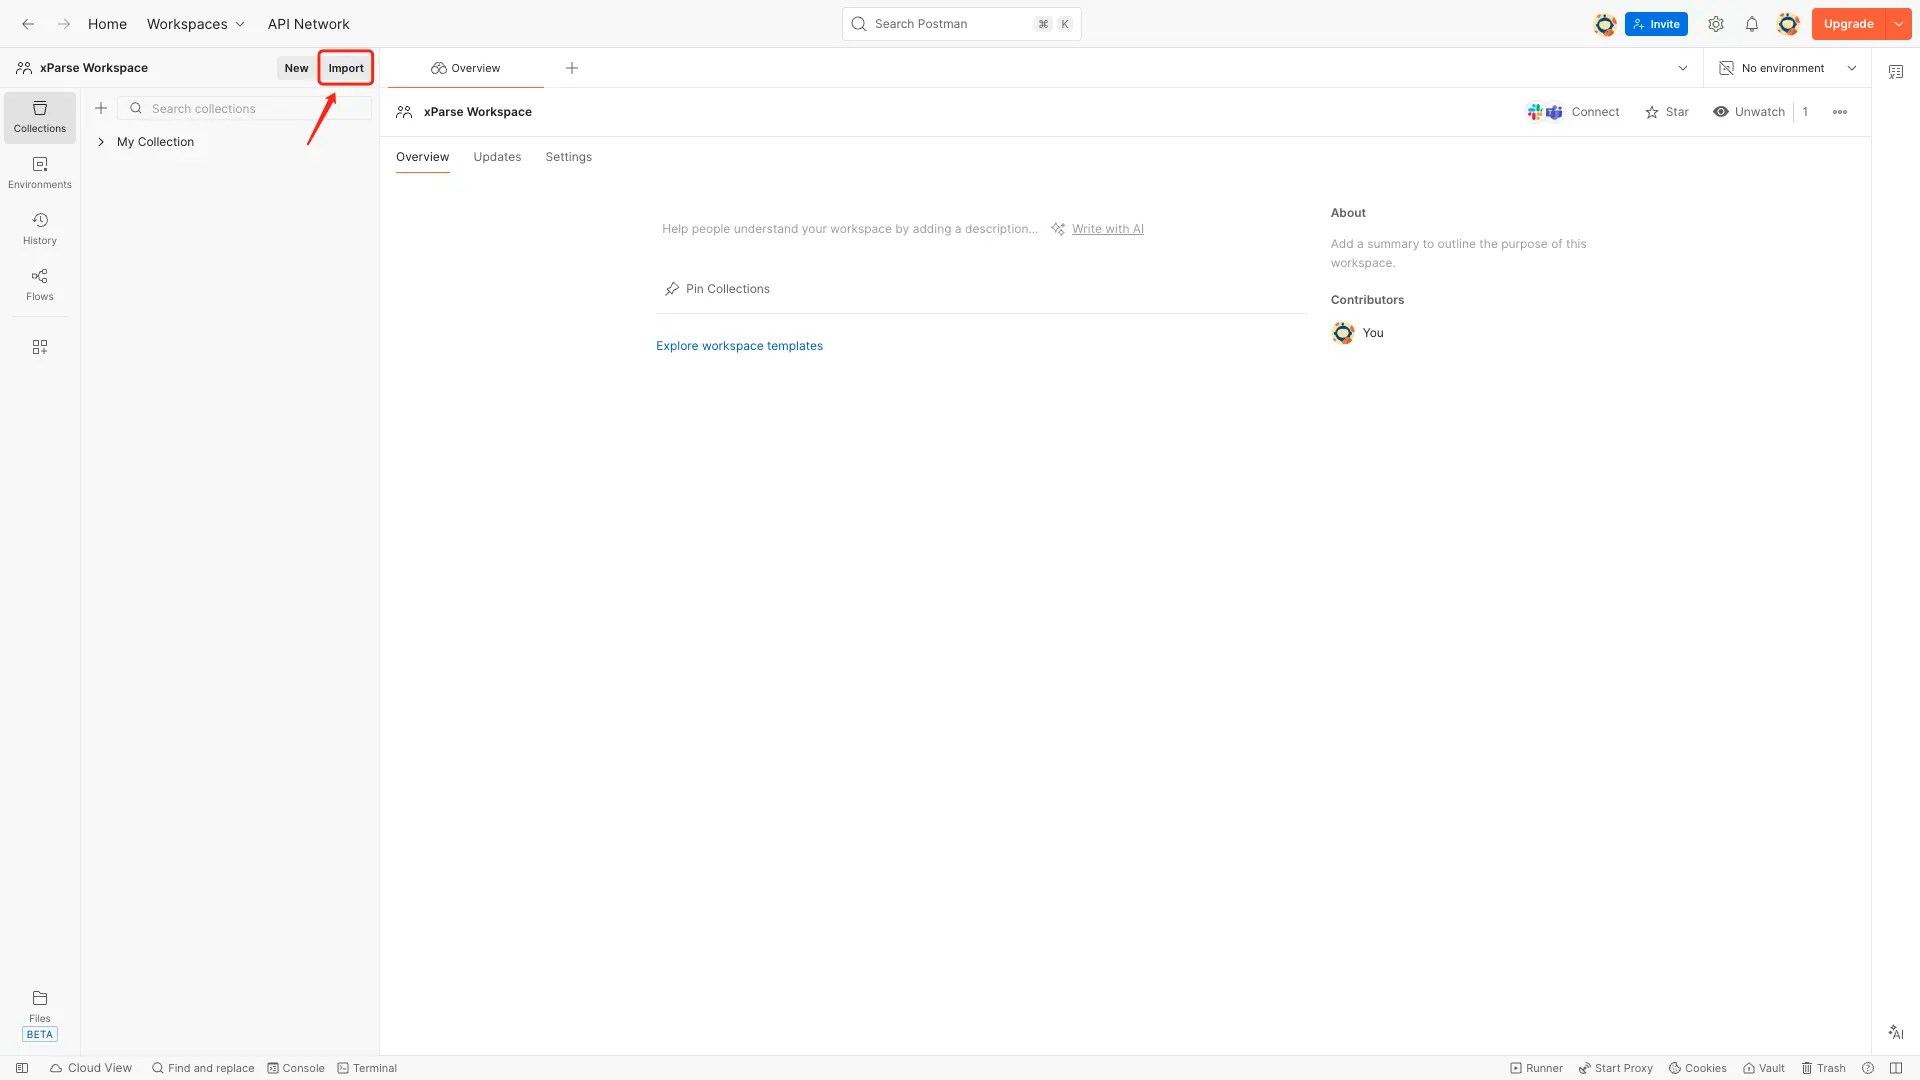
### 步骤2:打开Postman导入功能
1. 打开Postman应用
2. 点击左上角的 **Import** 按钮
 ### 步骤3:粘贴curl命令
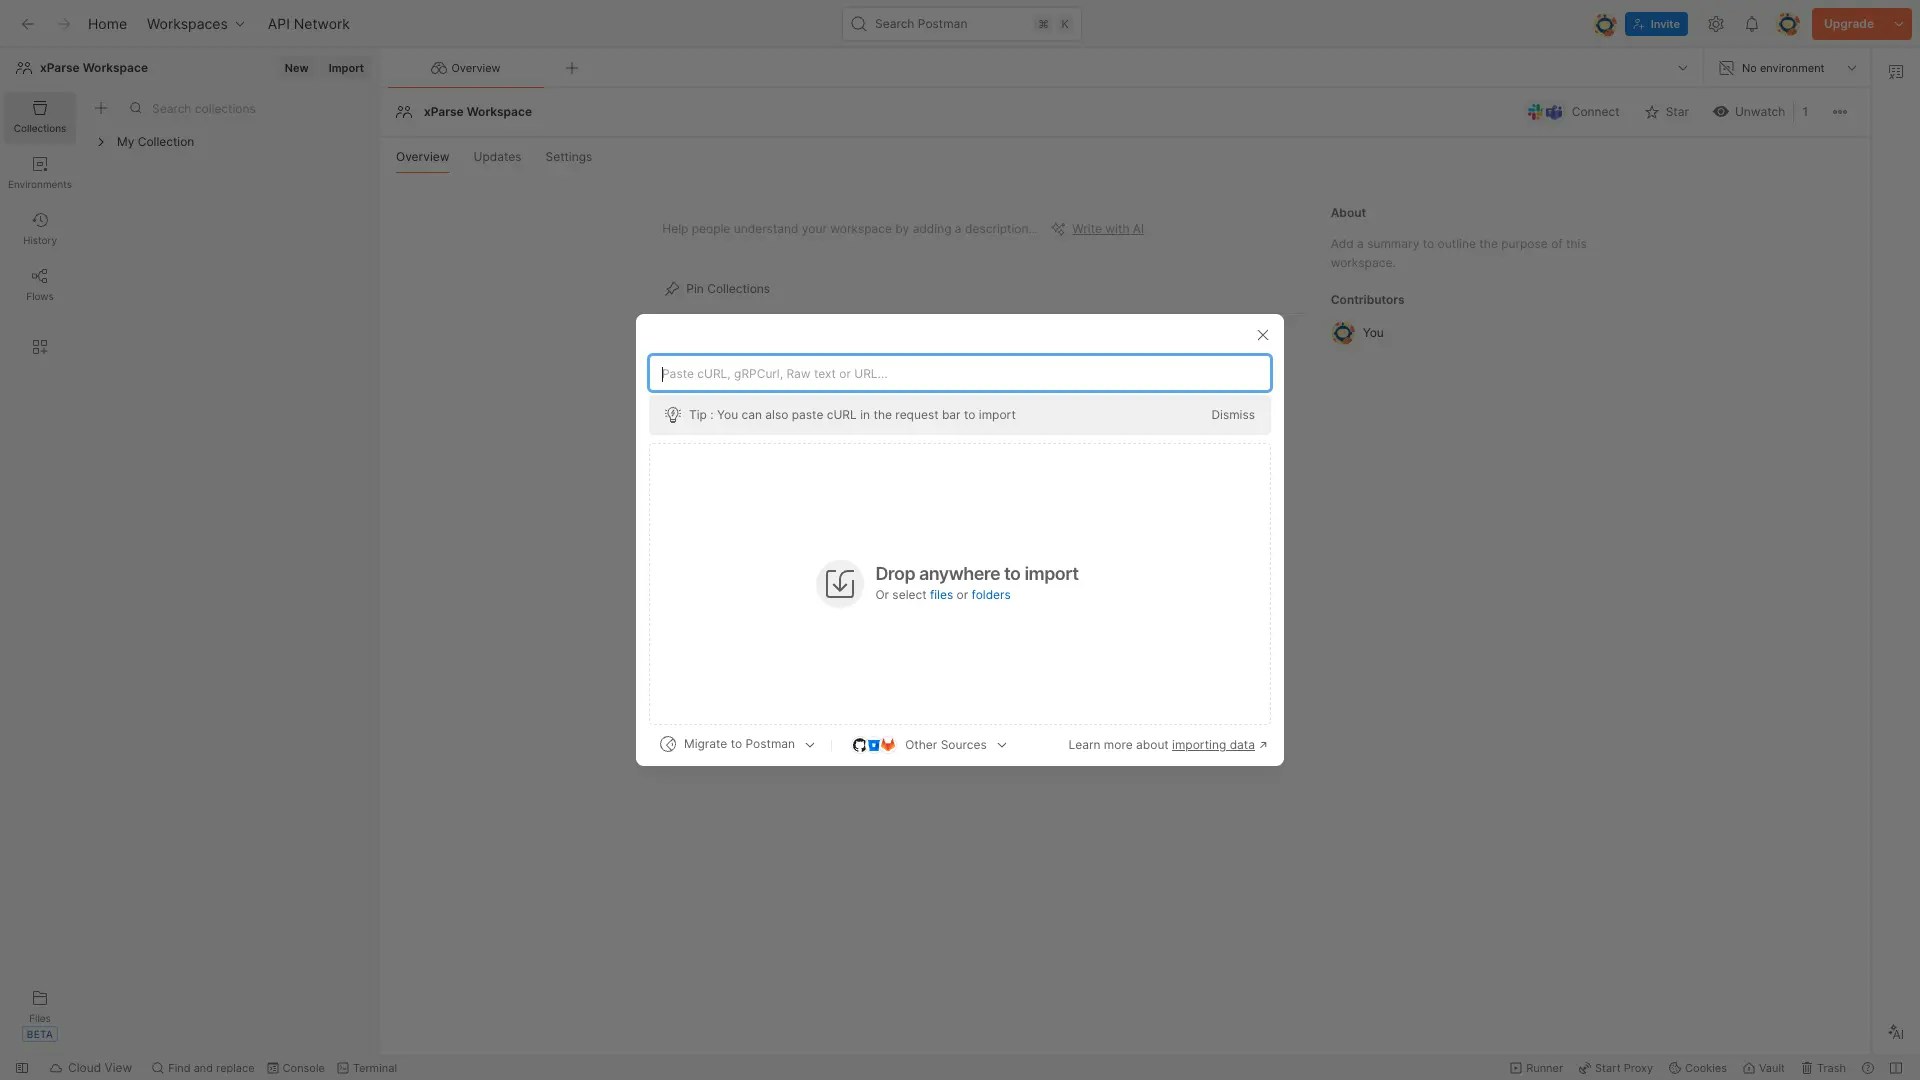
1. 在弹出的导入窗口中,将复制的curl命令粘贴到文本框中
### 步骤3:粘贴curl命令
1. 在弹出的导入窗口中,将复制的curl命令粘贴到文本框中
 ### 步骤4:确认导入
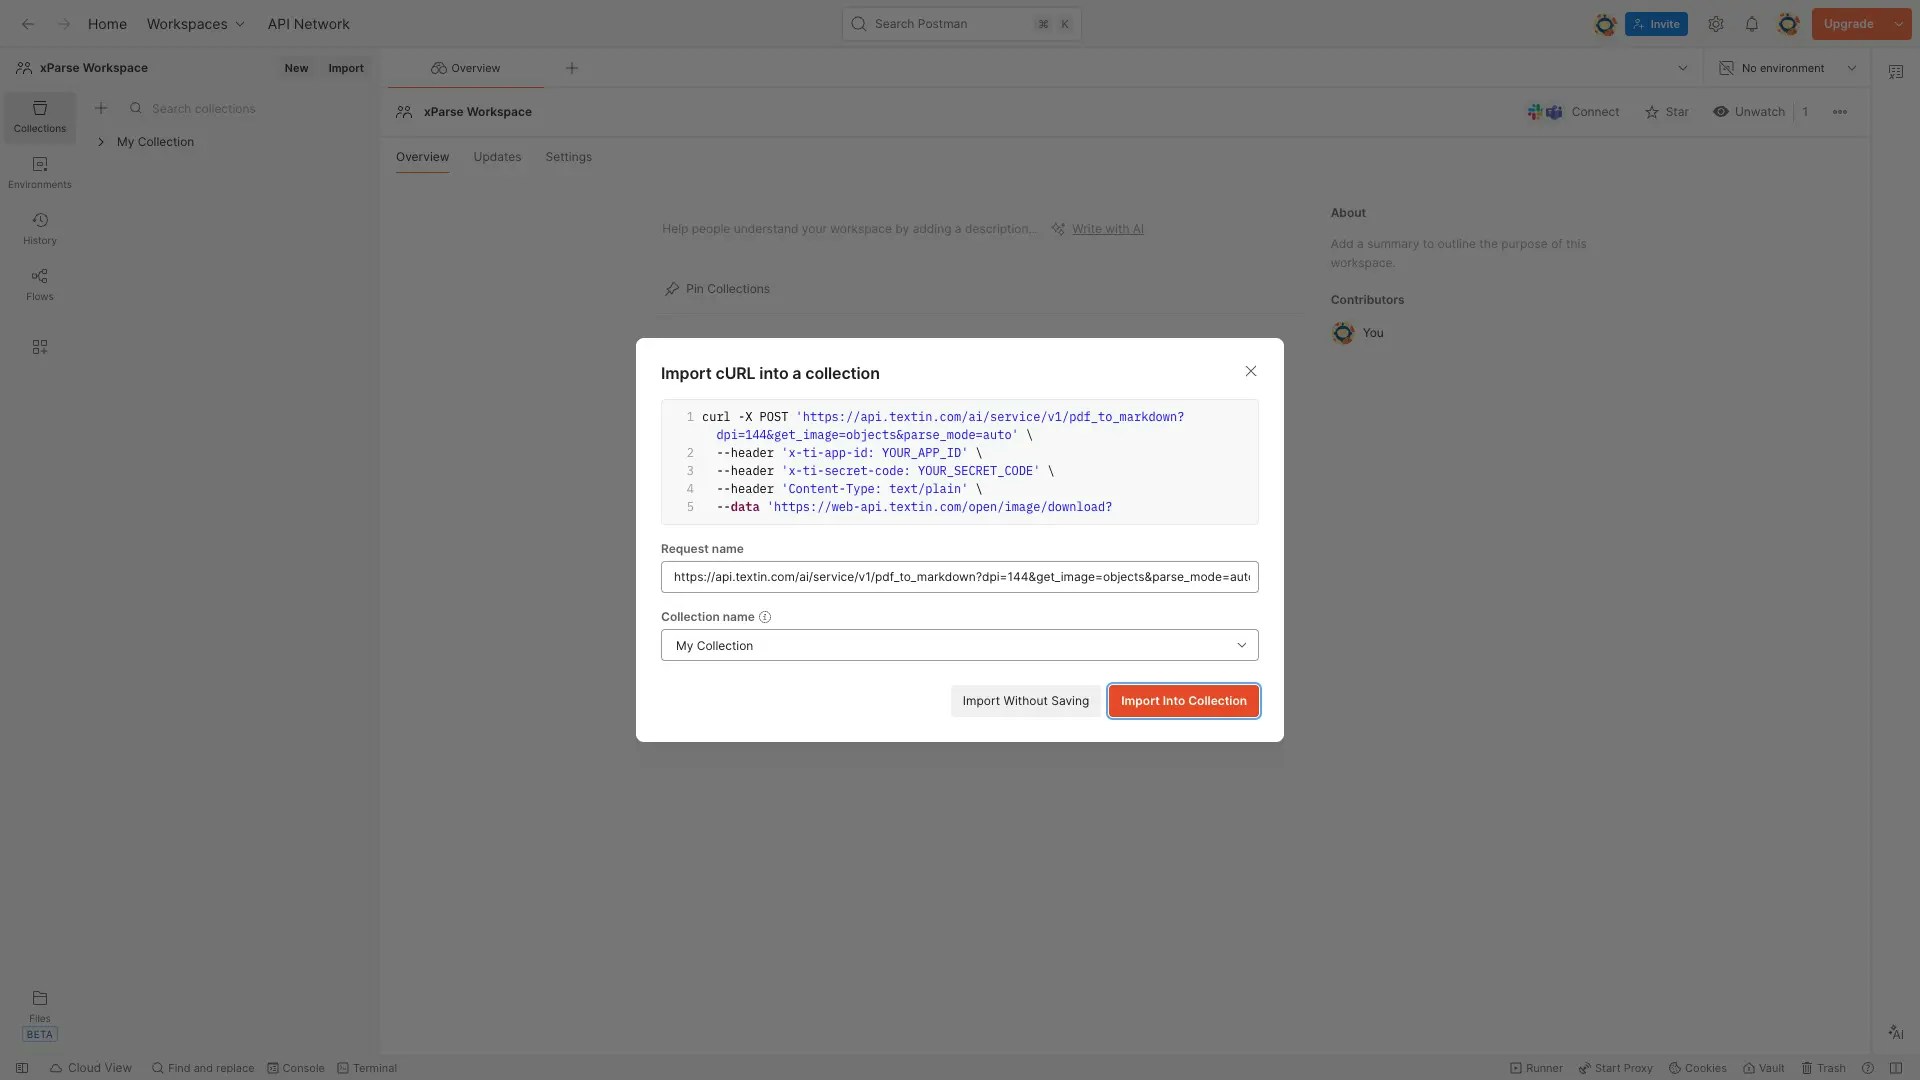
1. 在预览页面确认请求信息
2. 点击 **Import Into Collection**或者**Import Without Saving** 按钮完成导入
### 步骤4:确认导入
1. 在预览页面确认请求信息
2. 点击 **Import Into Collection**或者**Import Without Saving** 按钮完成导入
 ## 配置请求
### 重要:设置Body类型(仅方式一需要)
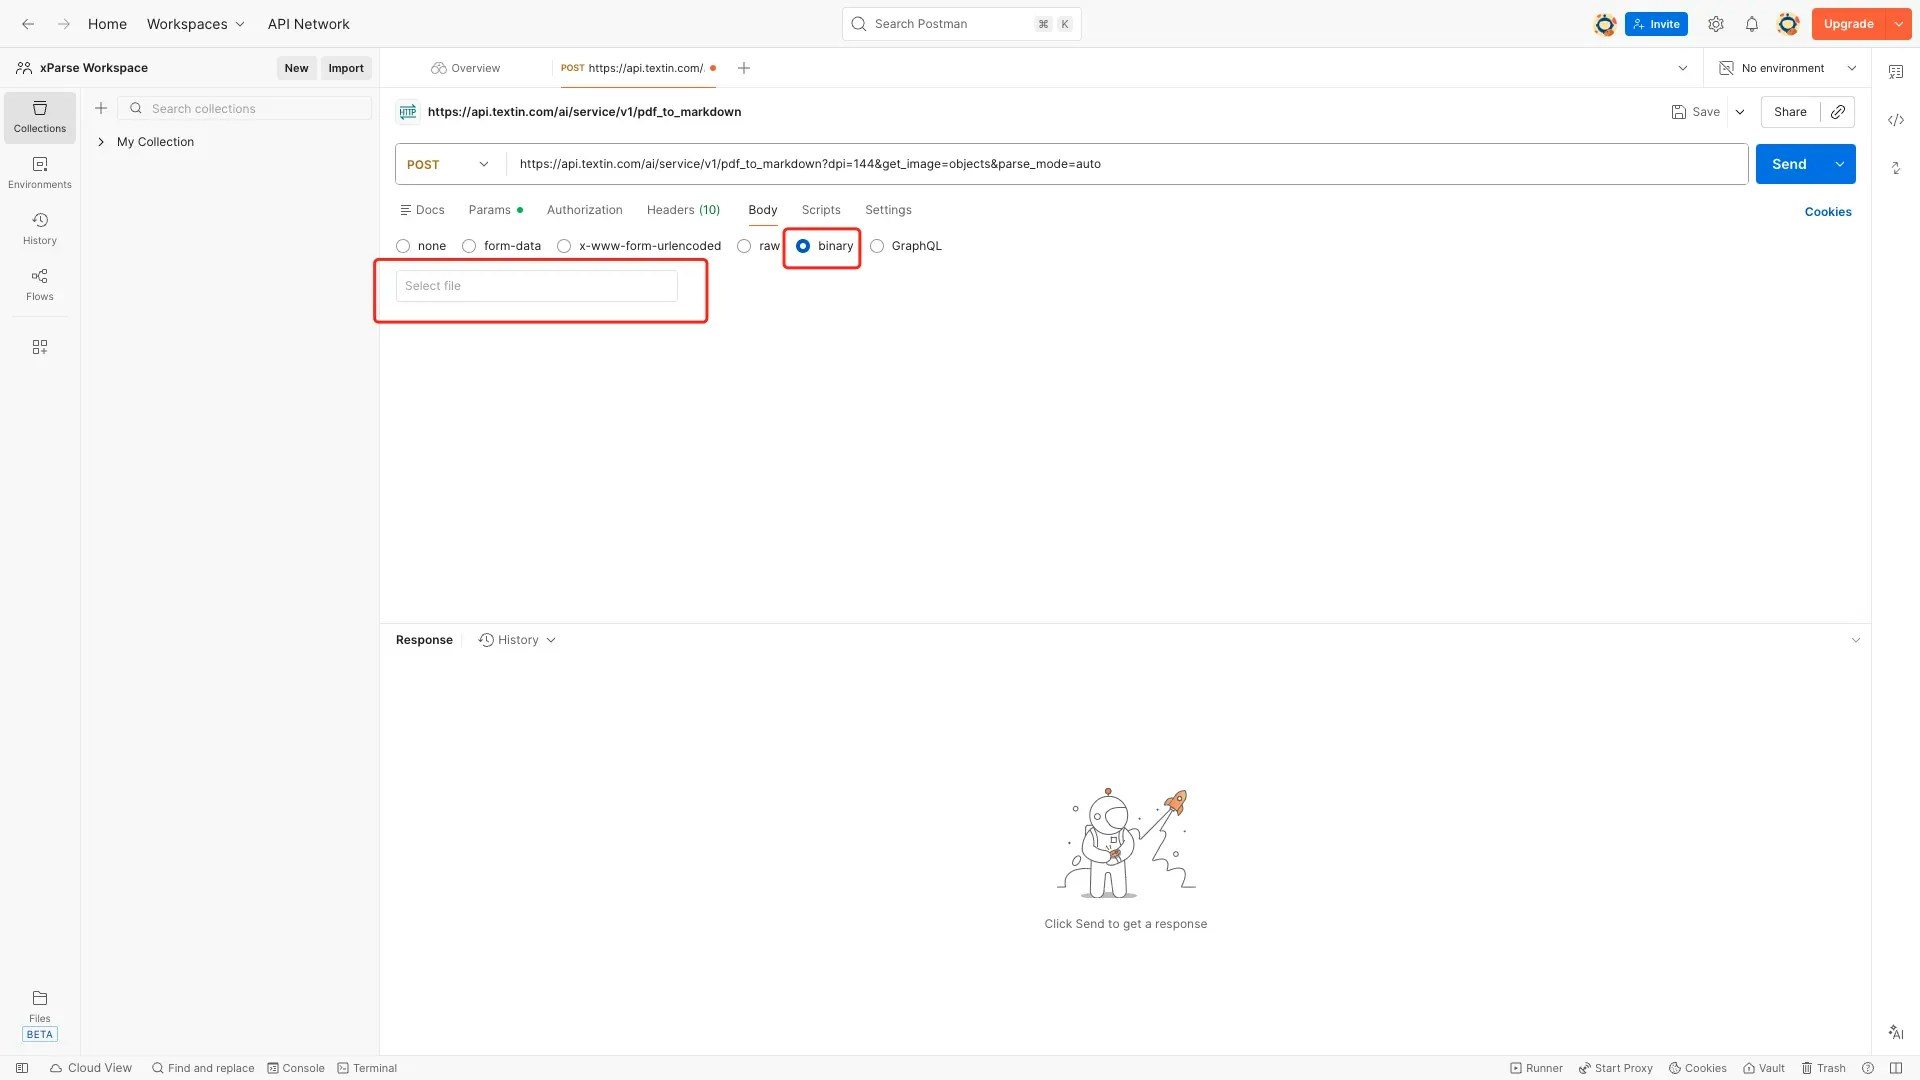
当导入包含`--data-binary '@file'`的curl命令时,Postman可能会将Body类型识别为raw而不是binary。您需要手动设置Body类型为binary。
**对于方式一(本地文件上传):**
1. 在导入的请求中,点击 **Body** 标签页
2. 选择 **binary** 类型(而不是raw)
3. 点击 **Select File** 按钮选择要上传的文件
## 配置请求
### 重要:设置Body类型(仅方式一需要)
当导入包含`--data-binary '@file'`的curl命令时,Postman可能会将Body类型识别为raw而不是binary。您需要手动设置Body类型为binary。
**对于方式一(本地文件上传):**
1. 在导入的请求中,点击 **Body** 标签页
2. 选择 **binary** 类型(而不是raw)
3. 点击 **Select File** 按钮选择要上传的文件
 **对于方式二(文件URL):**
Body类型会自动设置为raw,无需修改。确保Body内容为文件URL字符串。
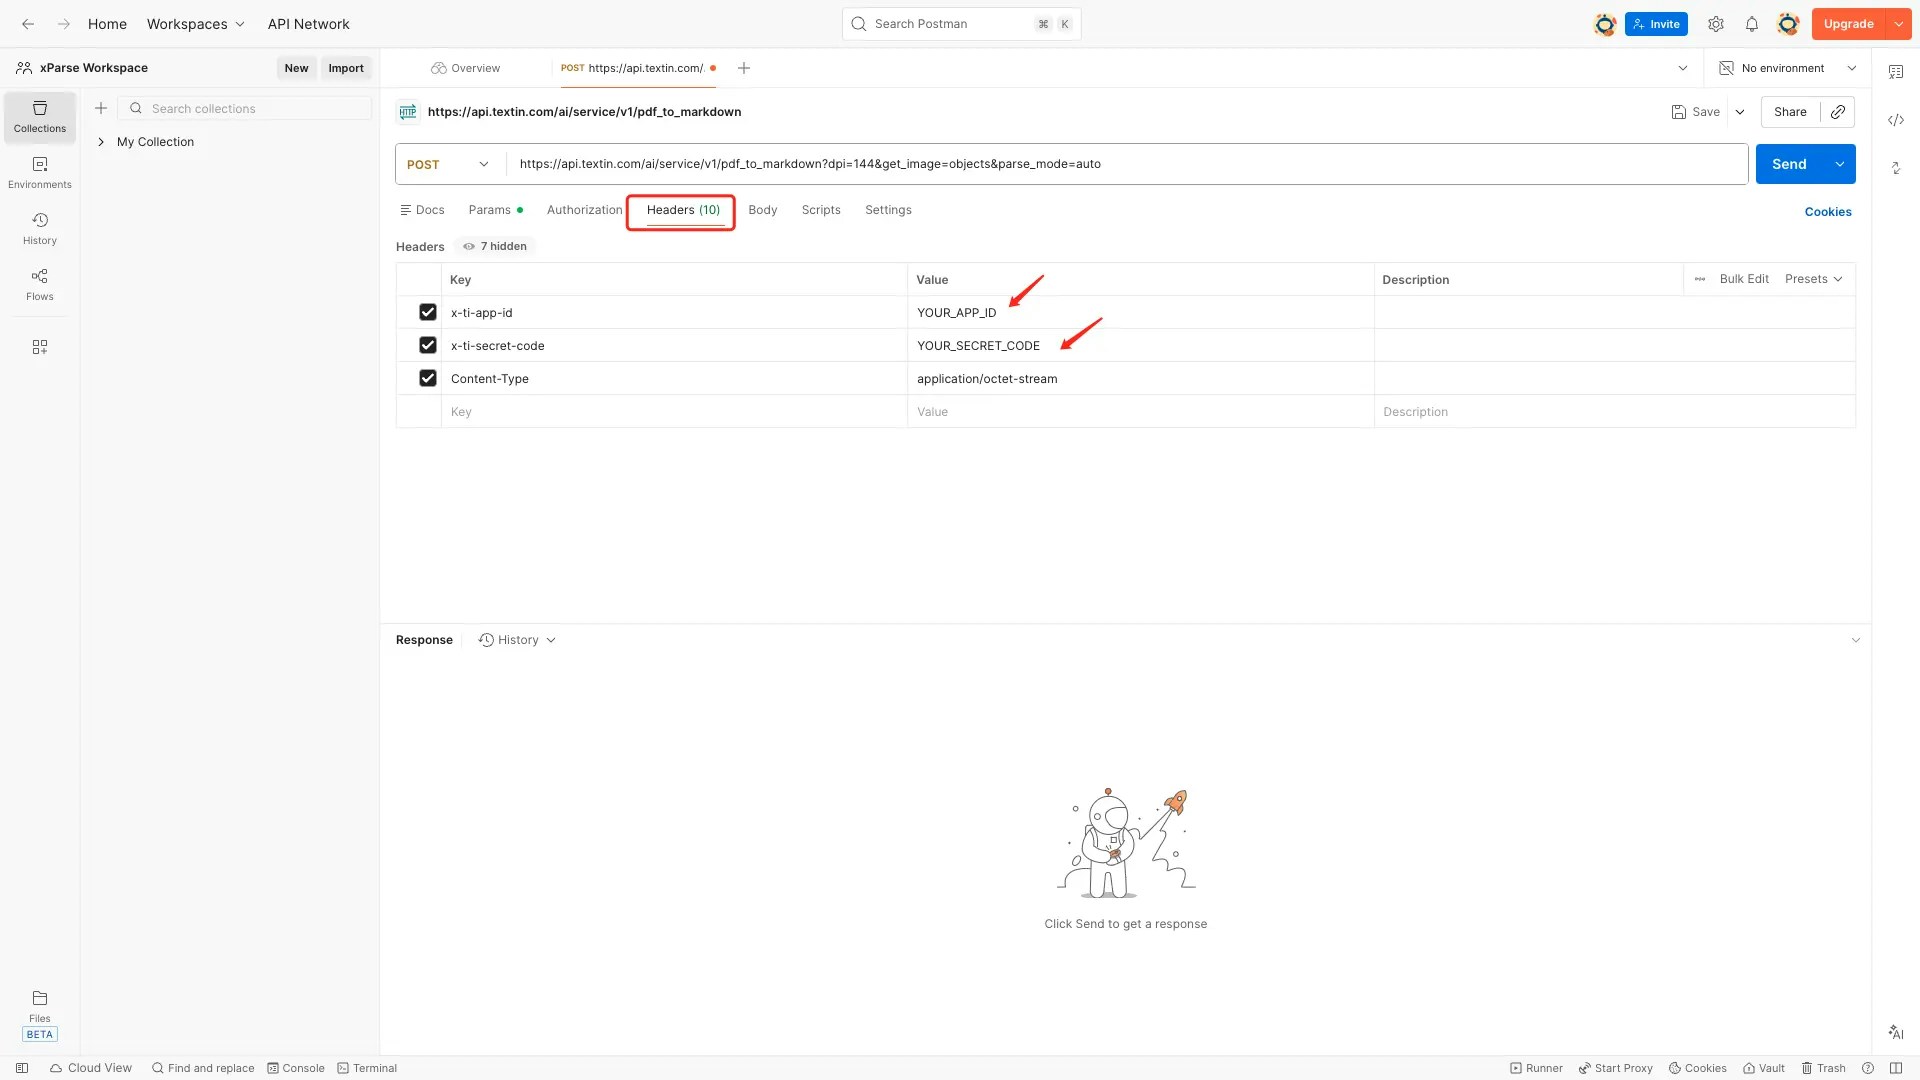
### 修改API Key
1. 点击 **Headers** 标签页
2. 找到 `x-ti-app-id` 和 `x-ti-secret-code` 两个header
3. 将 `YOUR_APP_ID` 替换为您的实际x-ti-app-id
4. 将 `YOUR_SECRET_CODE` 替换为您的实际x-ti-secret-code
**对于方式二(文件URL):**
Body类型会自动设置为raw,无需修改。确保Body内容为文件URL字符串。
### 修改API Key
1. 点击 **Headers** 标签页
2. 找到 `x-ti-app-id` 和 `x-ti-secret-code` 两个header
3. 将 `YOUR_APP_ID` 替换为您的实际x-ti-app-id
4. 将 `YOUR_SECRET_CODE` 替换为您的实际x-ti-secret-code
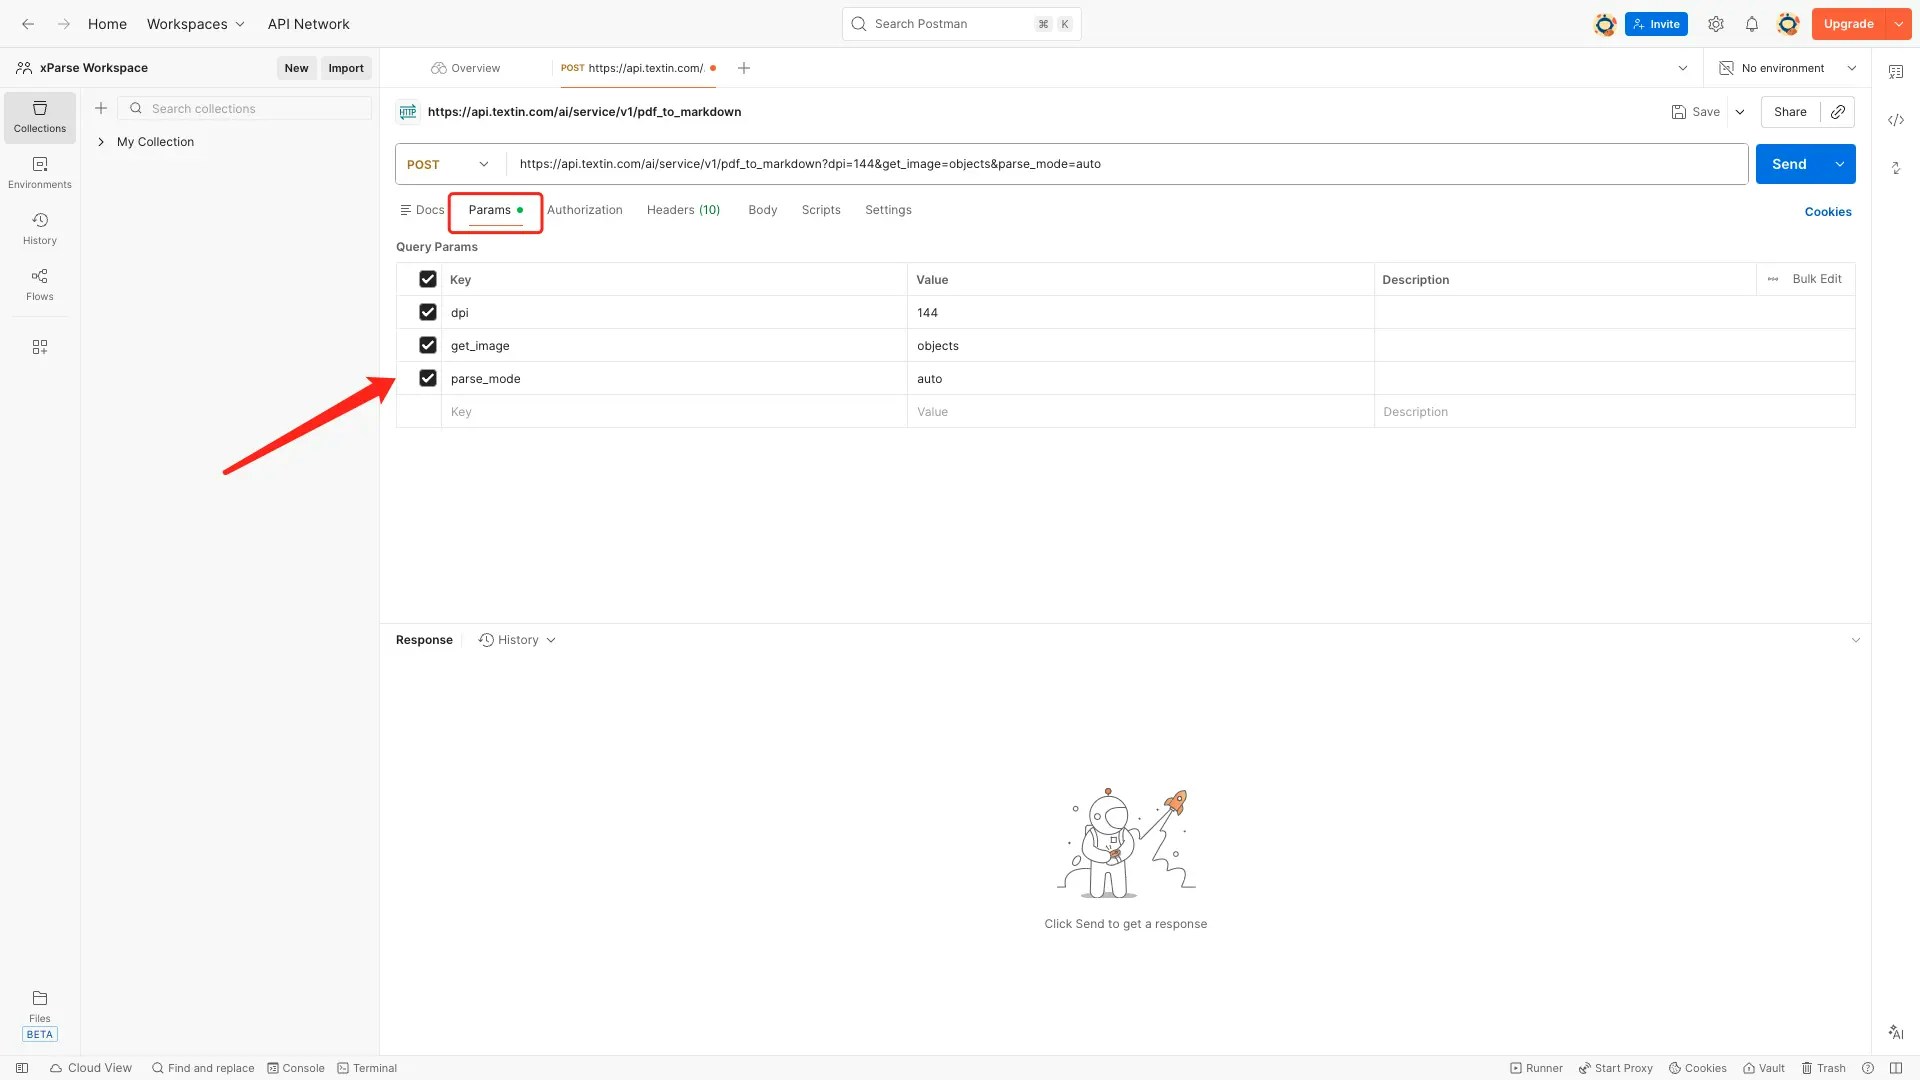
 ### 修改请求参数(可选)
如果需要修改URL参数,可以:
1. 点击 **Params** 标签页查看所有参数
2. 修改参数值,例如:
* `dpi`: 144(默认值)
* `get_image`: objects(默认值)
* `parse_mode`: auto(默认值)
### 修改请求参数(可选)
如果需要修改URL参数,可以:
1. 点击 **Params** 标签页查看所有参数
2. 修改参数值,例如:
* `dpi`: 144(默认值)
* `get_image`: objects(默认值)
* `parse_mode`: auto(默认值)
 ## 发送请求
1. 确认所有配置无误后,点击右上角的 **Send** 按钮
2. 等待响应返回
3. 在下方查看响应结果
## 发送请求
1. 确认所有配置无误后,点击右上角的 **Send** 按钮
2. 等待响应返回
3. 在下方查看响应结果
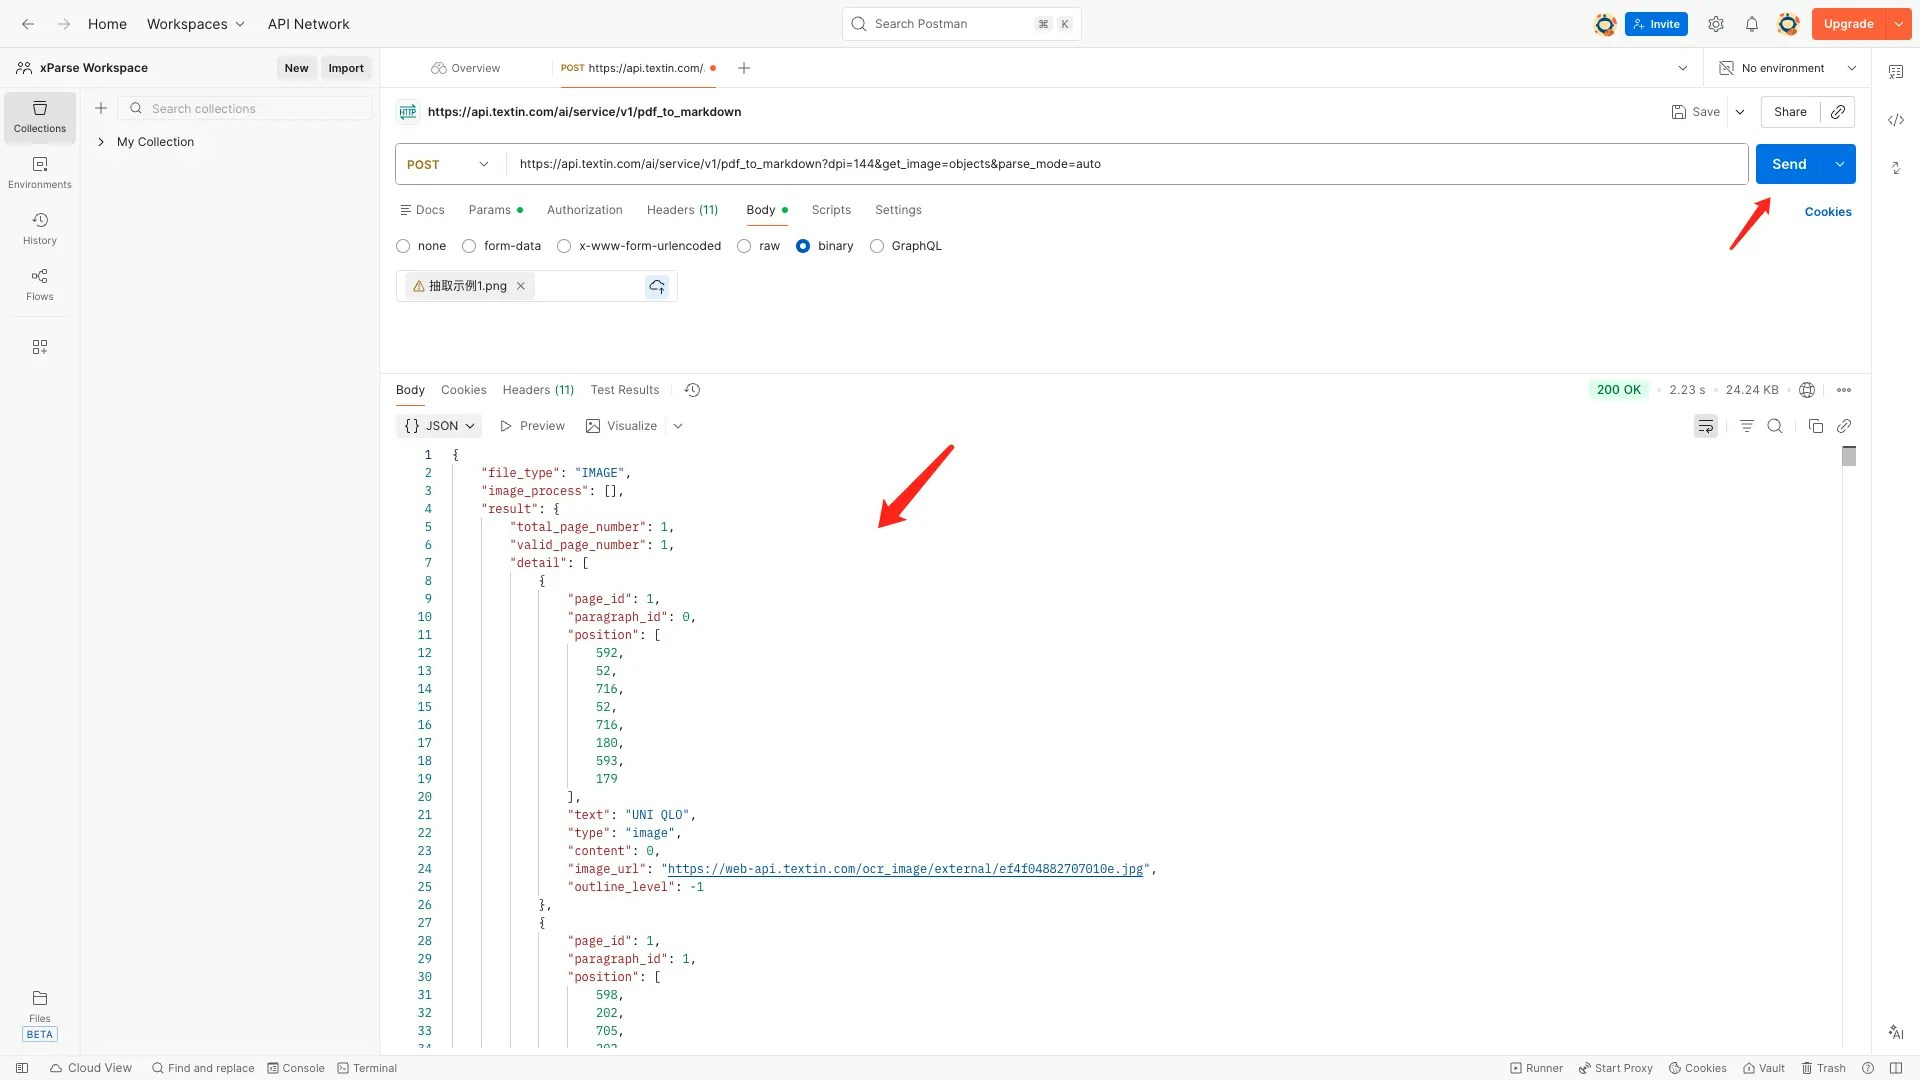 ## 查看响应结果
响应结果会显示在Postman下方的响应区域:
* **Body**:查看JSON格式的响应内容
* **Headers**:查看响应头信息
* **Status**:查看HTTP状态码(200表示成功)
响应结果如上图。
## 常见问题
### Q: 导入后Body类型不是binary怎么办?
A: 请按照上述"设置Body类型"步骤,手动将Body类型改为binary,然后选择文件。
### Q: 如何修改文件?
A: 在Body标签页选择binary类型后,点击"Select File"按钮重新选择文件。
### Q: 响应返回401错误?
A: 请检查API Key是否正确设置,确保x-ti-app-id和x-ti-secret-code都已正确替换。
### Q: 如何保存请求?
A: 可以将请求保存到Collection中,方便后续重复使用。点击请求右侧的"Save"按钮即可。
## 相关链接
* [文档解析快速启动](/xparse/parse-quickstart)
* [Apifox调试教程](/xparse/parse-debug-apifox)
* [API参考文档](/api-reference/endpoint/parse)
## 查看响应结果
响应结果会显示在Postman下方的响应区域:
* **Body**:查看JSON格式的响应内容
* **Headers**:查看响应头信息
* **Status**:查看HTTP状态码(200表示成功)
响应结果如上图。
## 常见问题
### Q: 导入后Body类型不是binary怎么办?
A: 请按照上述"设置Body类型"步骤,手动将Body类型改为binary,然后选择文件。
### Q: 如何修改文件?
A: 在Body标签页选择binary类型后,点击"Select File"按钮重新选择文件。
### Q: 响应返回401错误?
A: 请检查API Key是否正确设置,确保x-ti-app-id和x-ti-secret-code都已正确替换。
### Q: 如何保存请求?
A: 可以将请求保存到Collection中,方便后续重复使用。点击请求右侧的"Save"按钮即可。
## 相关链接
* [文档解析快速启动](/xparse/parse-quickstart)
* [Apifox调试教程](/xparse/parse-debug-apifox)
* [API参考文档](/api-reference/endpoint/parse)